Showing posts with label tutorial. Show all posts

Sunday, September 1, 2013

Bare necessities bag


When I leave the house, my bag almost invariably contains

  • my planner
  • the book I'm reading
  • a sketchbook
  • a current knitting project
  • my phone
  • my wallet
  • my coin-purse, because my wallet doesn't have space for coins
  • a water bottle
  • my pencil case
Optional extras include
  • my journal
  • a notebook for writing projects
  • my 'miscellaneous' notebook
  • camera
  • another knitting project in case I don't feel like working on the first one
  • my sewing kit
  • specific items I need that day


This could be construed as me having a terrible aversion to not having something to do, which is true, but it becomes even more uncomfortably irrational given that I usually cycle into town, so I can't say that those things are to occupy me on the bus in. I'm usually cycling to either meet someone or go to work, as well, so once there it would be impolite to start reading or writing. So in practise, I cycle into town, a large bag containing the weight of a small child in paper hanging off my handlebars just in case, then I cycle home, where I can use any of it.


I like small bags because they force me not to damage my back for no reason. Usually in pattern backgrounds this is where the "so I made one to suit my exact needs" comes in, but I made one for someone else, because I like the idea of it, but I need all that paraphernalia.


This bag was made using a 9mm crochet hook with Hoooked Zpagetti. (I'm a brat when it comes to other people's presents - I select yarn I want to use, then decide something to make with it.) The fabric is a bit difficult to work, but it's very quick to make, an easy beginner's project, and doesn't have seams, which I consider a bonus in anything.


Monday, October 29, 2012

Pattern: Starfleet logo chart

This is the pattern I used for my Starfleet gloves a few weeks ago (or glove, I guess, since the other one was the X-Men logo).  I used chunky yarn knit tight, because I wanted the gloves to be snug, but as long as your gauge has the right proportions it should work out.


The PDF with the pattern chart can be found here.


This is how it turned out on the gloves, but it can be plugged into hats or scarves too.

Sunday, October 28, 2012

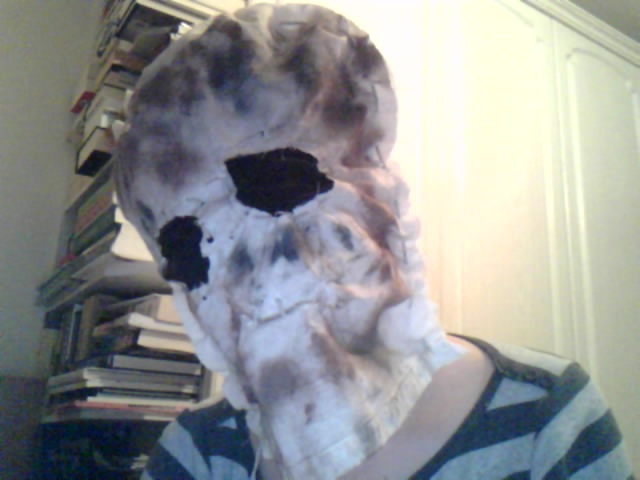
How-to: Rush-job scarecrow mask

Are you stuck for a Hallowe'en costume? Can you sew a button?* I've got you covered!  The photos are poorly-lit webcam quality, but you're running out of time, you can't afford to be fussy here.

Requires sack-like-cloth, twine, sheer black material, cheap brown and black eyeshadow or other make-up, scissors, darning needle.

1. Find some sack-cloth, or one of those reusable Bags For Life that looks sort of like sack-cloth.


Did you find one? You're doing so well!


2. Sew it to a more rounded shape that fits your head. Stitches can be long and loopy and messy - it'll just add to the effect. I think having the seam on the outside looks better, but you can turn it seam facing in if you prefer.


3.  Mark where you want the eyeholes to be, then cut eyeholes. Adjust as necessary so you can sort of see.


Really, if you do it yourself you'll probably need to adjust the size and positioning.


4.  Cut a slit for the mouth, and sew it up roughly and loosely with twine.


5.  Turn the mask inside out, and sew sheer black material over the eye-holes. (The edges of the black material will not be visible from the outside.) Again, stitches can be rough and messy.


Wrong side out...


Right side out...


Two dead soulless eyes!

Pro-tip: sheer tights are only sheer when they're being worn and stretched out. You will not be able to see though them in a dimly-lit room.

5.  Rub brown and black eyeshadow, or whatever you're using, onto the outside of the cloth. Check in advance that you have not bought sparkly eye-shadow (oops).  Rub the cloth against itself so it smudges and doesn't looks neat and symmetrical.


8.  Yay, you made a scarecrow mask! Wear with pride!

-

On realising I couldn't see, I did this with liquid eye-liner so that I could take off the mask without being entirely boring.


My costume! I borrowed my uncle's gardening trousers and wore an oversized men's top from Penneys. Ideally I would have had straw sticking out of the ends of the sleeves, top and mask, but it is pretty hard to find straw in Dublin.


*You know, I have no time for people over ten who can't sew a button (while possessing the physical propensity to sew a button, and having grown up in a house where buttons needed to be sewn). That's not being able to sew, that's a very basic life skill. It's like reaching adulthood without being able to make toast, having grown up in a house with a toaster.

Monday, June 25, 2012

Free pattern: Flip-top gloves

I finally wrote up the pattern for the gloves I made before Christmas!  You can see more pictures here and here.

-


You will need:   4-ply/fingering weight yarn (~200m) – I used Debbie Bliss Rialto 4-Ply
  2.75mm DPNs/two pairs of circular needles, or size required for gauge
  Stitch holders or scrap yarn
  Stitch markers
                          Darning needle


Pattern


The PDF file is available here.


-

Please let me know if you find any errors in the pattern, and if you make a pair, I'd love to see them!


EDITED to replace the big long pattern with the dropbox link, because it's much less aesthetically displeasing.

Monday, June 13, 2011

FO and Pattern: Snug cupcake hat

A friend commissioned a cupcake hat with earflaps.  All of the cupcake patterns I found were for beret-type hats, which wouldn't suit earflaps, so I put this together.  I think if you want a more cupcakely hat it's best to leave out the earflaps, but for completeness I've included them here.


The pattern is for one size, but should fit most adults.  (I'm about average height and build, so probably have an average sized head, but left some wiggle room because I have giant hair and don't know the person the hat is for.)


Uses bulky yarn in two colours (Cup, or sponge, and icing)*
6mm DPNs
1 stitch marker
Yarn needle

Gauge: 10 x 10 st in stockinette stitch is 2.75’ wide by 2.25’


Ears (make 2)

CO 7st in cup colour (CC)

Row 1: k all st
Row 2: k1, p1, k1, p to 3 st before end, k1, p1, k1
Row 3: k3, kfb, k to 4 st before end, kfb, k3

Repeat rows 2 and 3 until you have 15 stitches.
Work 8 rows st st, continuing edge ribbing. (End after RS row)

From either earflap: CO 20 st for back of hat
Join other earflap and work across: K1, p1, k1, p3, k1, p1, k1, p3, k1, p1, k1
CO 34 st for front of hat
Work across first earflap as above.
PM and join to work in the round.

Hat:

(If not making earflaps, just CO 84st)

Work p1k1 rib for until hat measures 2.5’ from beginning.

To change colour from cup colour (CC) to icing colour (IC):
Continue working rib pattern for CC, while working IC in st st

I take really awkward photos.
Row 1: Work *2st CC, 3st IC, 2st CC* rep from * to end

Row 2: Work *1st CC, 5 st IC, 1st CC* rep from * to end
Row 3: K all sts IC

K 12 rows

Next row: *k5, k2tog* rep from * to end (72 st)
Next row: k all sts
Next row: *k4, k2tog* rep from * to end (60 st)
Next row: k all sts
Next row: *k3, k2tog* rep from * to end (48 st)
Next row: k all sts
Next row: *k2, k2tog* rep from * to end (36 st)
Next row: k all sts
Next row: *k1, k2tog* rep from * to end (24 st)
Next row: k all sts
Next row: k2tog 12 times (12 st)
Next row: k2tog 6 times (6 st)

Break yarn, and use tapestry needle to pull through remaining st.

Button (worked in the round):

CO 6st in CC
Row 1: k all st
Row 2: kfbf into each stitch
Row 3: k all st
Row 4: k3tog 6 times
Row 5: k all st

Break yarn and pull through live st. Pull ends together and weave into the top of the hat.

Tassels (make 2):

Cut 5 lengths of each colour, a little more than twice as long as you want your tassels to be.
Hold all strands in a bundle and twist tightly right along the length.
Fold the strands end to end and let go – the tassel should wrap around itself.
Tie loose end in a knot.
Pull through the bottom of earflap (a crochet hook is a help here) – front to back, then pull the free end through the loop.

Weave in all ends and you’re done!


You're free to make and sell this hat, but please don't claim it as your own pattern.  I know it's nothing impressive, but it is mine.

* I used Brown Sheep Lamb's Pride Bulky in Roasted Coffee and Strawberry Smoothie.

P.S. If anyone makes this I'd love to see how it turns out!

Saturday, February 26, 2011

Mars Bar Cake

One of my not-written-down-because-that-way-it-doesn't-count-if-I-break-it new year's resolutions was to update this at least once a fortnight.  It's a good exercise in writing.  I keep a diary, but that's more for the sake of memories and chronology, so if I'm busy an entry can be something like "Woke up late, lectures fine, lab report took forever, didn't get around to doing X" where X = the most pressing item on my to-do list.  For this, though, I know other people are reading it (stats are addictive), so articulation seems worthwhile, even if it's just talking about yarn.  I have been fierce busy and not had time to make things, but for the sake of an update, here is the recipe for Mars Bar Cake.

You will need:
  • 3 King-size/ 5 snack-size Mars Bars
  • 3 oz. margarine (not essential but it makes the chocolate melt a little smoother, and means things won't burn the second you turn your back)
  • 1 tbsp Golden syrup (again, not essential)
  • 3 big Mint Crisp Bars
  • 1 big Dairy Milk Bar
  • Rice Krispies

I don't know what the size of the Cadbury's bars I mean is termed.  Not the huge ones, but the ones usually only sold in Supermarkets, bigger than you'd get a new's agents of at the checkout.  You know the ones.

  • Melt the Mars Bars, margarine, golden syrup and half of one Mint Crisp Bar in a saucepan.  It might seems like it's done for a while, with lumps taking a while to melt, but it'll be clear when it's done. It's very smooth.
  • Stir in Rice Krispies until the consistency feels right.  (This is a very "sure, you know yourself" recipe, but it's hard to go wrong with it.)
  • Pour into a square pan.
  • Melt the Cadbury's chocolate in the microwave, pour over Krsipies.
  • Leave in the fridge to set.
  • Om nom nom.
And here is one I made yesterday for my dad's birthday!  It went down well.