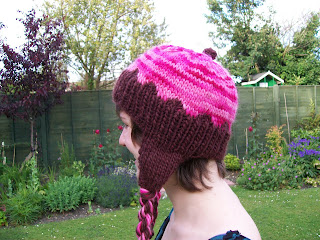
A friend commissioned a cupcake hat with earflaps. All of the cupcake patterns I found were for beret-type hats, which wouldn't suit earflaps, so I put this together. I think if you want a more cupcakely hat it's best to leave out the earflaps, but for completeness I've included them here.
The pattern is for one size, but should fit most adults. (I'm about average height and build, so probably have an average sized head, but left some wiggle room because I have giant hair and don't know the person the hat is for.)
Uses bulky yarn in two colours (Cup, or sponge, and icing)*
6mm DPNs
1 stitch marker
Yarn needle
Gauge: 10 x 10 st in stockinette stitch is 2.75’ wide by 2.25’
Ears (make 2)
CO 7st in cup colour (CC)
Row 1: k all st
Row 2: k1, p1, k1, p to 3 st before end, k1, p1, k1
Row 3: k3, kfb, k to 4 st before end, kfb, k3
Repeat rows 2 and 3 until you have 15 stitches.
Work 8 rows st st, continuing edge ribbing. (End after RS row)
From either earflap: CO 20 st for back of hat
Join other earflap and work across: K1, p1, k1, p3, k1, p1, k1, p3, k1, p1, k1
CO 34 st for front of hat
Work across first earflap as above.
PM and join to work in the round.
Hat:
(If not making earflaps, just CO 84st)
Work p1k1 rib for until hat measures 2.5’ from beginning.
To change colour from cup colour (CC) to icing colour (IC):
Continue working rib pattern for CC, while working IC in st st
 |
| I take really awkward photos. |
Row 1: Work *2st CC, 3st IC, 2st CC* rep from * to end
Row 2: Work *1st CC, 5 st IC, 1st CC* rep from * to end
Row 3: K all sts IC
K 12 rows
Next row: *k5, k2tog* rep from * to end (72 st)
Next row: k all sts
Next row: *k4, k2tog* rep from * to end (60 st)
Next row: k all sts
Next row: *k3, k2tog* rep from * to end (48 st)
Next row: k all sts
Next row: *k2, k2tog* rep from * to end (36 st)
Next row: k all sts
Next row: *k1, k2tog* rep from * to end (24 st)
Next row: k all sts
Next row: k2tog 12 times (12 st)
Next row: k2tog 6 times (6 st)
Break yarn, and use tapestry needle to pull through remaining st.
Button (worked in the round):
CO 6st in CC
Row 1: k all st
Row 2: kfbf into each stitch
Row 3: k all st
Row 4: k3tog 6 times
Row 5: k all st
Break yarn and pull through live st. Pull ends together and weave into the top of the hat.
Tassels (make 2):
Cut 5 lengths of each colour, a little more than twice as long as you want your tassels to be.
Hold all strands in a bundle and twist tightly right along the length.
Fold the strands end to end and let go – the tassel should wrap around itself.
Tie loose end in a knot.
Pull through the bottom of earflap (a crochet hook is a help here) – front to back, then pull the free end through the loop.
Weave in all ends and you’re done!
You're free to make and sell this hat, but please don't claim it as your own pattern. I know it's nothing impressive, but it is mine.
* I used Brown Sheep Lamb's Pride Bulky in Roasted Coffee and Strawberry Smoothie.
P.S. If anyone makes this I'd love to see how it turns out!
P.S. If anyone makes this I'd love to see how it turns out!


2 comments:
Love the hat! The earflaps are amazing, so important for those cold winter days and cute.
Thanks very much!
Post a Comment